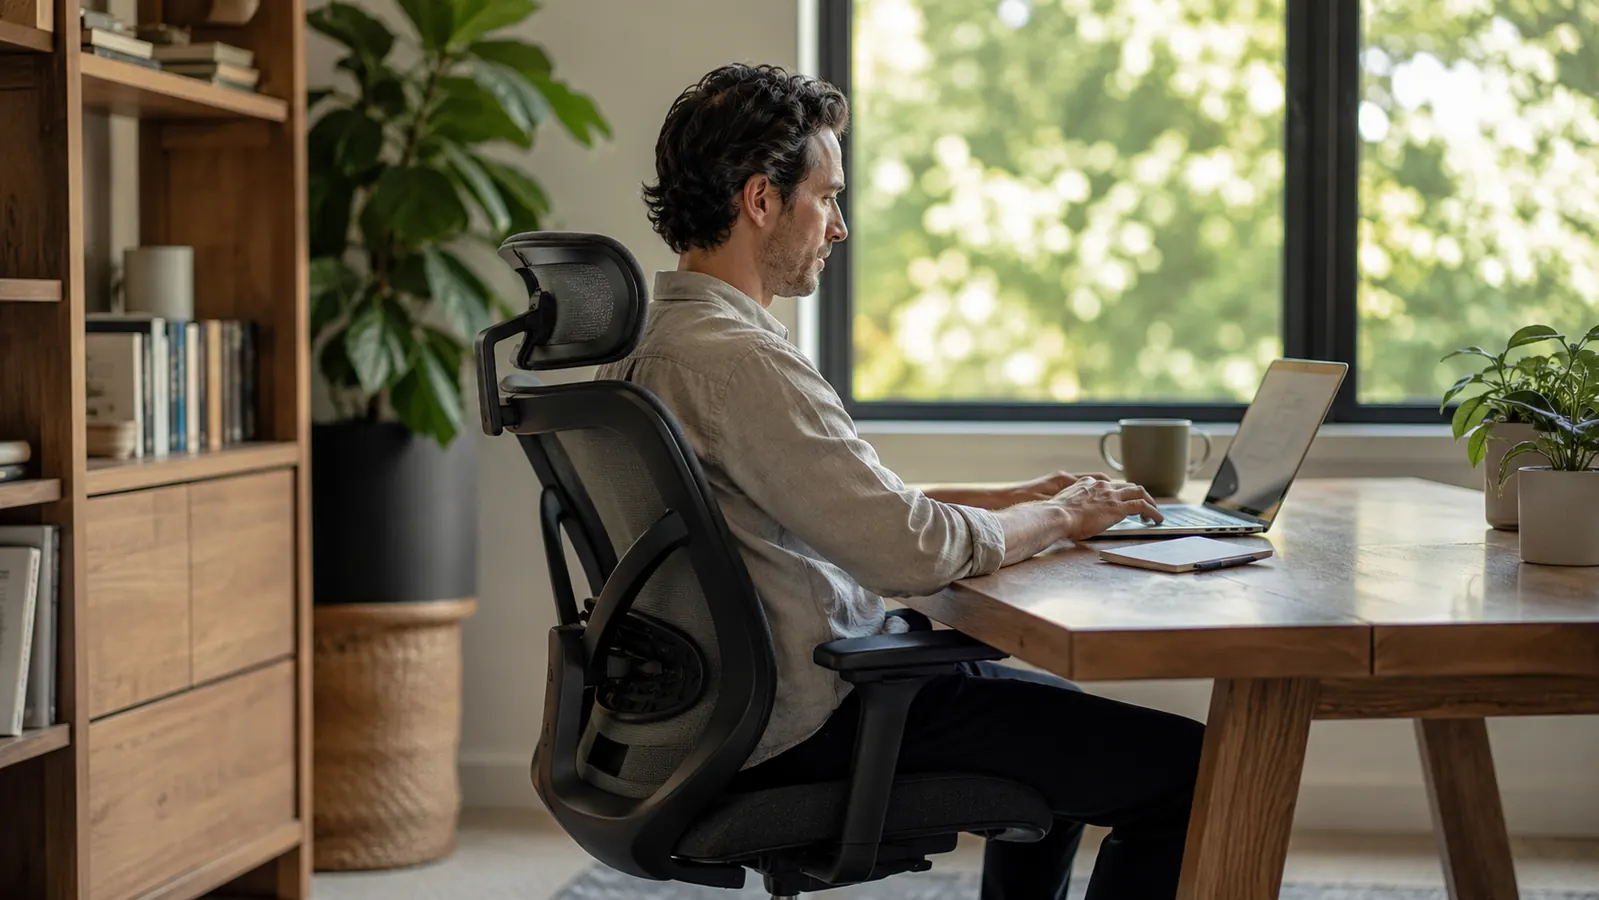
I have built and run companies from home offices for over a decade. The number one mistake I see founders and remote professionals make is spending money on monitors, mechanical keyboards, and standing desk mats while still sitting in a $79 folding chair they bought in 2019. Everything else in your setup is downstream from where you sit. If the chair is wrong, your posture is wrong, your energy is wrong, and your focus is gone before lunch. This guide walks you through a five-step setup process that starts with the chair and works outward, using the X XISHE Ergonomic Office Chair as the anchor piece.
You do not need to spend four figures to get this right. What you need is a chair built around your body, a desk calibrated to that chair, and a monitor position that keeps your neck neutral. Follow these steps in order and you will notice the difference by the end of your first full workday.
Your back stops paying the price for a bad chair the day you replace it.
The X XISHE Ergonomic Office Chair (4.5 stars, 3,031 reviews) combines a mesh back for breathability, PU leather seat for durability, and a built-in lumbar support system, all at a price point that does not require a business case to justify. It is the foundation this entire setup is built around.
Amazon Check Today's Price on Amazon →Step 1: Set Your Seat Height Before Touching Anything Else
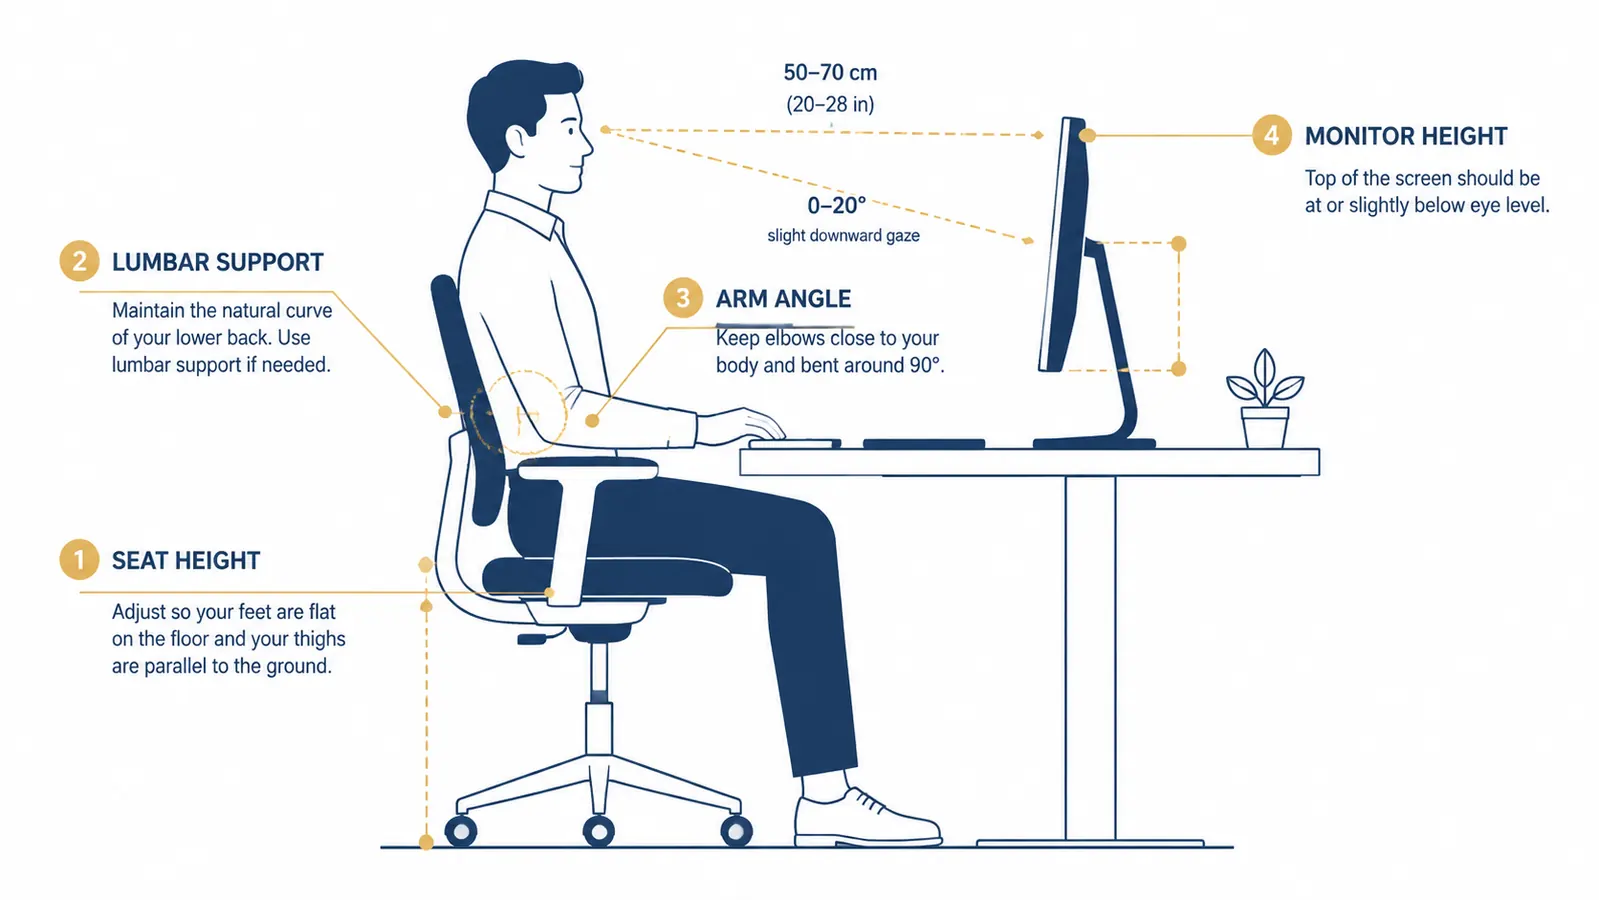
Before you adjust the armrests, before you set the lumbar, before you even plug in your monitor, get your seat height correct. Sit in the chair with both feet flat on the floor. Your thighs should be roughly parallel to the ground, with your knees at a 90-degree angle. If your feet dangle or your knees ride up past your hips, the seat height is wrong and every other adjustment you make will be built on a bad foundation.
The X XISHE chair uses a pneumatic height lever on the right side. Most people never adjust it after assembly. Pull up once to raise, push down while sitting to lower. Give yourself 30 seconds to dial this in with shoes on, since most people wear shoes at a desk. Write down or mentally note the position so you can reproduce it if someone else moves the chair.
One common mistake: setting the seat so high that your arms float above the desk. That forces your shoulders up and causes trapezius tension within a couple of hours. You should be able to rest your forearms on the desk surface with your shoulders relaxed and your elbows at roughly 90 degrees. If the desk is too high to achieve that with proper seat height, you need a keyboard tray or a desk with adjustable-height legs. Get the seat right first, then solve the desk.

Step 2: Configure the Lumbar Support to Fit Your Lower Back
Lumbar support is where most chairs fail and where the X XISHE earns its keep. The built-in lumbar cushion sits in the lower back region of the mesh backrest. When you lean back into the chair, you should feel gentle, consistent pressure in the curve of your lower spine, not a lump jabbing one spot, and not nothing at all.
If the lumbar feels too low or too high, some models allow vertical adjustment by loosening the cushion bracket and repositioning. Check the manual for your specific unit. The target is the natural inward curve of your lumbar spine, roughly at belt-line height when seated. Once it is in the right place, the lumbar support does its job passively. You should not have to think about sitting up straight because the chair does it for you.
If you have an existing lower back condition, consider adding a separate memory foam lumbar pillow behind the built-in support. But for most founders putting in standard eight- to ten-hour days, the integrated lumbar on this chair is sufficient.
The chair's lumbar support does its job passively. You should not have to think about sitting up straight because the chair holds you there.
Step 3: Set Armrest Height So Your Shoulders Stay Relaxed
Armrests are underrated. Done wrong, they push your shoulders up into a shrug position that locks up your neck and upper back within two hours. Done right, they float your forearms at a neutral angle so your shoulders can drop and stay dropped all day.
Sit in the chair at your correct seat height. Let your arms hang naturally at your sides, then bend your elbows to 90 degrees. That is where your armrests should be. If the armrests are higher than that resting elbow height, lower them. Most people run armrests too high without realizing it.
The X XISHE armrests adjust via buttons underneath each pad. They move in a reasonable range for most desk setups. If you use a keyboard tray mounted below the desk surface, you may want the armrests lowered further or tucked in while typing to keep them out of your movement path. When on a call or reviewing documents, slide the armrests back into position as a resting surface.
Step 4: Calibrate Your Monitor Distance and Eye-Level Height
Now that your chair is dialed in, adjust your monitor to match it. Sit in your newly configured position and look straight ahead. The top of your monitor should be at or just below eye level. If you are looking up at your screen, your neck is in extension all day. If you are looking down more than 15 degrees, you are loading the cervical spine. Either way, you pay for it in neck and shoulder pain by mid-afternoon.
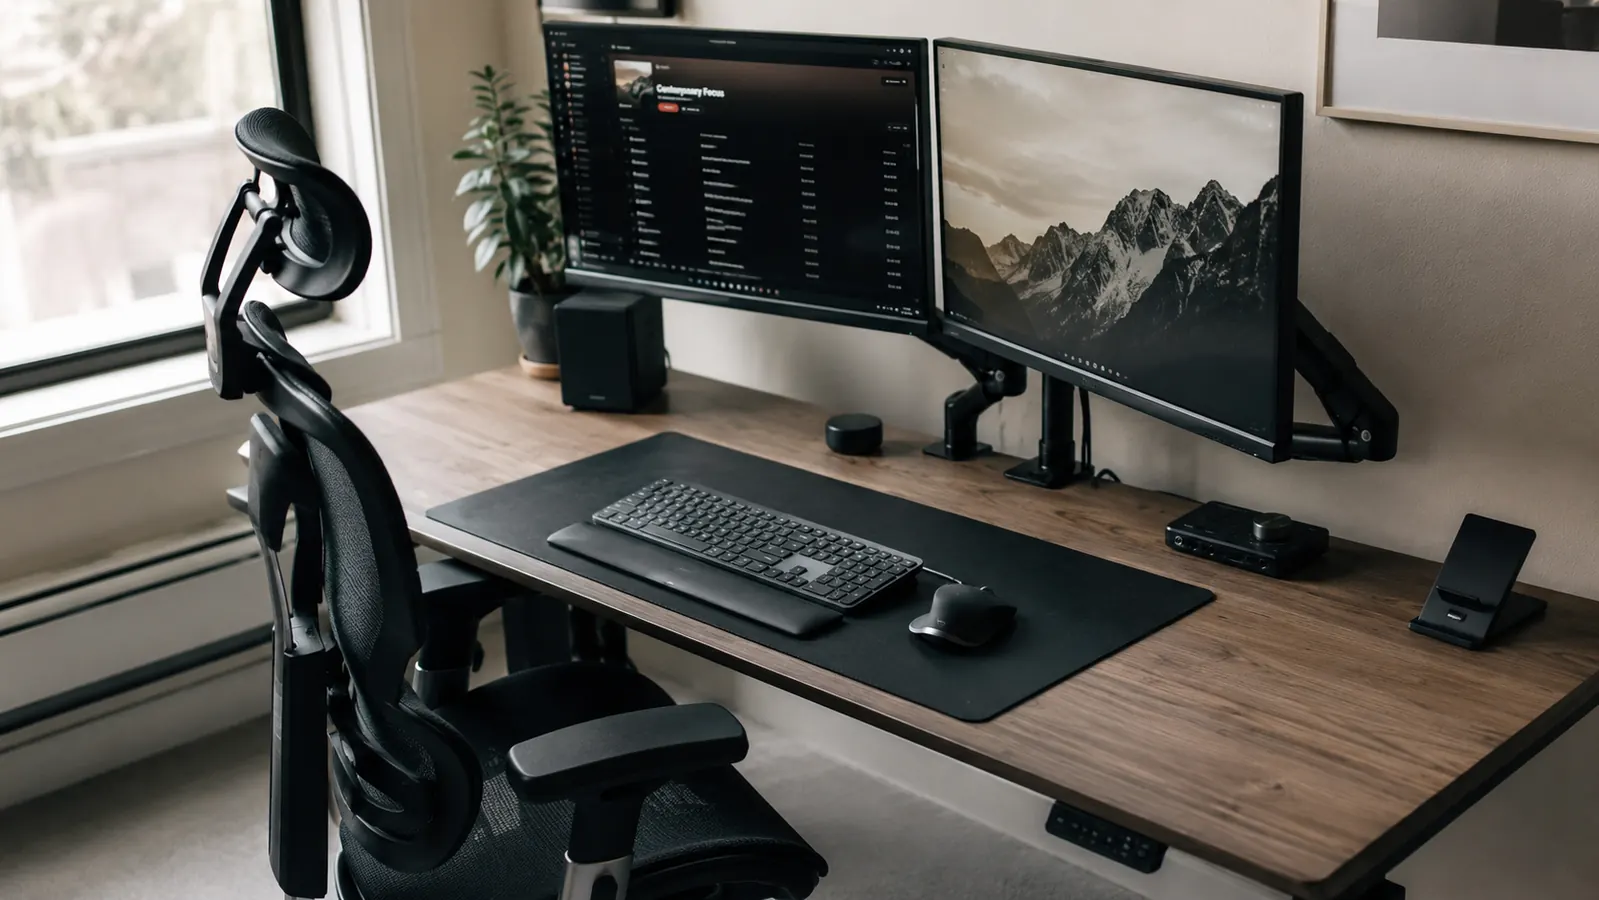
Monitor distance is a function of screen size. The general rule is arm's length, measured from your seated position. For a 27-inch monitor, that is roughly 24 to 30 inches from your eyes. For a laptop screen, you almost certainly need a separate stand or arm because the screen is too small to be far enough away without dropping your chin to see it. A monitor arm is the single best $30 to $50 upgrade you can make after the chair.
If you use a dual-monitor setup, center the primary monitor directly in front of you and offset the secondary at a 30-degree angle to your dominant side. Do not put two monitors equidistant and centered, forcing you to turn your head equally to both. You use one screen 80 percent of the time. Give it the prime position.
Step 5: Build Your Deep-Work Block Schedule Around Your Physical Setup
Physical setup is not enough on its own. Even a perfect ergonomic environment causes fatigue if you never move. The research on prolonged sitting is clear: the damage is not from sitting in a good chair versus a bad chair. It is from sitting continuously for more than 90 minutes regardless of chair quality.
Build movement breaks into your deep-work schedule. The most effective pattern for knowledge workers and founders is a 90-minute focused block followed by a five- to ten-minute break where you stand, walk briefly, and reset. This is not productivity advice layered on top of ergonomics. It is ergonomics. Your chair, your desk, and your monitor setup keep you comfortable within each block. Your schedule prevents the cumulative damage of staying in any one position too long.
Set a recurring 90-minute timer from the moment you sit down to work. When it fires, stand up, walk to a window, refill water, or do a 60-second stretch. Then return and restart. Over a full 10-hour founder day, you will take five to six breaks, totaling under an hour of movement, and you will feel fundamentally different at 7 p.m. than you did before you had this system in place.
What Else Helps: The Four Accessories Worth Adding After the Chair
The chair is the foundation, but a few low-cost accessories compound the benefit significantly. A monitor arm gets your screen off the desk surface and into the right eye-level position without taking up workspace. A footrest helps shorter-statured founders maintain the correct hip angle when their chair height is locked by a fixed desk. A document holder placed at monitor height eliminates the neck-down position many people fall into when reading physical papers or tablets. And an anti-fatigue mat at your standing position, if you take your breaks standing nearby, keeps your legs from complaining during those five-minute resets.
None of these need to be expensive. A $25 monitor arm, a $20 footrest, and a $15 document clip will move the needle more than a $300 mechanical keyboard. Spend in order of impact: chair first, then the accessories that support the chair's work.
Spend in order of impact. Chair first, then the accessories that support the chair's work. Everything else is secondary.
If you want a deeper look at why the chair itself is the single highest-ROI ergonomic investment for founders, the breakdown is in the companion piece on 10 reasons an ergonomic chair reduces back pain. And if you want the full performance review of the X XISHE chair after 90 days of daily use, the long-term chair review covers what changed and what held up.
The foundation of a pain-free 10-hour workday is where you sit, not how often you stretch.
The X XISHE Ergonomic Office Chair gives you adjustable seat height, built-in lumbar support, height-adjustable armrests, and a breathable mesh back, all in one chair rated 4.5 stars by over 3,000 buyers. It is the anchor piece for the setup described in this guide.
Amazon Check Today's Price on Amazon →